Friday, May 7, 2010

Diary post (sorry)

2 comments
I know I said I was going to use this blog for my crafts and various projects I am working on, but I really need to write a small blog about me. I don't have time to make a new blog for this so it is going here. (New blog to come titled :failed woman)

We all have those "Ah Ha" moments in live, and most of the time they are good moments right? Well today I had an Ah Ha moment and it left me feeling really crappy. My Ah Ha moment came while looking in the mirror, followed by a "shit your fat."

I have known for quite a while that I am over weight, that I could do to lose some weight, larger then average however you want to say I am carry more fat then I should be. But for some reason I have not been obsessed with it, yes I tried to lose weight every now and again to feel healthy and what not but I have really thought of myself as ugly. Today I was trying on clothes (you know taking out the summer stuff) and noticed that it all seemed a little snug. It was not until I went to the mirror and saw I looked like did it hit me. "Damn girl, your really, really fat, and it kind-of makes you ugly."   I was shocked, hurt and let down. WH always tells me that I am beautiful, sexy ... What is wrong with him does he not see the blob I have turned into?

Arghhhhhhhhhhhhhhh o.k even self pity for one day. That is all I am going to allow myself to think about this today. Now I am going to have to do something about it. I am going to change this!

Sorry for the non craft/ project blog but it was really bugging me.

Red Handed.

0 comments
So as you can tell by the gloves we have just finished our staining. We did not think it was going to come out reddish ( "ish" by the way "is not a word we use these days" as I was told today by a grade 3) we thought we had a very natural looking stain bought by again we are learning. Don't go by the sample apparently.  
It did not turn out too bad just not the way we wanted it to go. Oh well what are you going to do? We sure as hell are not going through the whole process again. So I will learn to live with. We are hoping it will dry differently and will lighten up with the varnish like they say it will. I am not holding my breath. 
 Aidan opening the stain. 

Me staining the floor

The floor almost all stained. See the rag on the floor? That was white when we started, that is the second one we used. 


All stained, the lighting is really off in this one. I will try to take a better shot tomorrow in the sunlight. This room as wonderful light in the day time, another reason it is going to make an awesome craft room.

Thursday, May 6, 2010

Seeing myself

4 comments
So no scrapping today :o( I was teaching :o)

I love that I get to live with the man I love, with two amazing pets, working on our 1st home together, and doing two jobs I love soooooooooooo much. 

Speaking of working on the house together we conditioned the floor in the craft room tonight.  Not quite sure what conditioning does for the floor besides make it look amazing. With all the "bumps" we hit with this room so far we were not taking any chances. The stain suggested we condition the floor 1st to help get an even coat. We looked it up and everything we read suggested conditioning the wood 1st so we did. I am totally in love. I can't wait to see what it is going to look like stained. I know I am such a geek to be so happy about a floor but in the long run it is for my craft room and I have always wanted my very own craft room. It is going to be to the most awesome room ever!  It is a spot just for me, a place I can escape to, just to create. A place I can properly store all my craft supplies so nothing get ruined sitting around getting things throw on top of it, or to have the cat sitting on it etc. It will be a place I can proudly display my work with it being showy as it will be my room just for ME! Super excited! Only a matter of drying time now. Once this is done we can stain, then seal. Wait for it to dry again and the floor will finally be done.  "AND THEN" we will have to think out colors for the walls. Any ideas? Something that will be great for creating, soothing and aesthetically pleasing. 

Wednesday, May 5, 2010

Craft Room

3 comments


I didn't get any scrapping done today as it was a very busy day at work,we had a nice supper with friends and then we went to work on the craft room. Seeing as I had no scrap photos to share I thought it was a great time to share the progress of the craft room to date.

When we 1st looked at the house the room looked like this
Great for a little girl not so great for us. I am not a big big pink girl. I like pink but not for a room, I really don't like flower wall paper, and white carpet really would not work for us with a red dog and black cat. So we decided this room was going to need a new coat of paint and we would have to take the carpet up.  This proved more challenging than we thought...
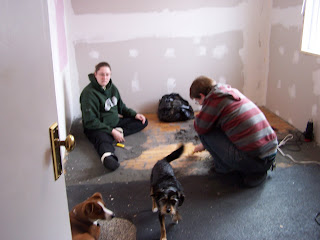
It started out nice and easy. Then came the trouble...


It may look like he is having fun and well, we when this was taken. However a short time later we were not smiling anymore. Around where that bit of green is showing through the wall started to crumble. The wetness of the wallpaper remover crumbled the plaster that was attempting to cover the big hole in the wall. There was a window in the center of this wall that was never properly boarded up/framed out.


This was what was behind that wallpaper tar filler and all. The new board you see is what Aidan and his dad put in. Yup that hole is what they tried to plaster over nice huh?
When we looked at the wood in the wall we saw that there was writing on the wood stating when it was put up. So we took the idea and wrote our own messages to leave in the wall of our 1st home.   (Super cute I know tee hee) 

Did you ever read the children's story "If you give a mouse a cookie" ? That is kind of what happened here. Once we took down the wall on one side we saw that the other outside wall was not insulated properly and seeing how we were at it we might as well continue and take down that wall and insulate it right. Only when the wall was down we saw that the window was not braced so that was the next project.
Then it was not to putting up the new gyproc


Thank God Aidan's dad was out to help when that needed to be done because there is no way at all I would have been able to help lift that stuff, and we needed a lot of guidance in how to do it right. Thanks Weldon!

That was not even the hard part after it was on the wall all the screw holes had to be filled. 


And as you can see there was quite a few to fill.


With the walls all done it was time to tackle the floors. We thought all we had to do was pull up the carpet and put a new flooring down. As 1st time home owners we found we were wrong again. Once the carpet was up and we tried to remove the underlay we found that it was glued to the floor. Not a big deal right? Wrong!  Every inch of the "black crap" (as we so loving named the stuff) was glued down. It took forever to get the stuff up and some really great friends who offered a helping hand.


Stacey, Steve, and even Belle came to help scrape the "black crap" off the floor.


Even friends who are not even in the province managed to help out. Virginia and Matt sent a G/C which allowed us to buy a wonderful new sander to sand the floor. 

As you can tell this was a lot of work and took a very long time to do.


But slowly but surely it came along. 


After we had as much scraped up as we could we used goo gone to take off the rest. A LOT of Goo Gone.


Then the sanding began. Sooooooooooooo much sanding to do. 


But we even had help with that. Salem kept coming in to make sure we didn't miss a spot and to track the dust every where to let us know how much dust we were creating. 


Not like we could not tell ourselves. This was just the window where we were not sanding. This is just one place it settled. 


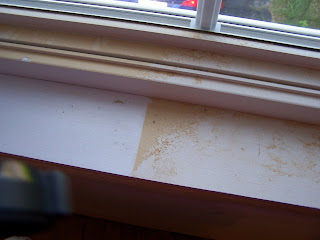
After a lot of sweeping, vacuuming, we were ready for cleaning which is what we did tonight. 


And we are still learning. Remember that window still I showed earlier? Well we thought that would be a good place to lay the lid of the cleaner while we did the floor so it was not in our way. After we were finished and went to close the lid we saw that it was not such a great idea. Aidan put plastic over his feet to walk across the floor to get the lid. tee hee fun times as new home owners.


Next pics will be of the conditioning, staining and sealing of the floor. Then begins the adventures of painting the wall, decorating the room.  Let's hope that we don't come across anymore surprises. :o)

Monday, May 3, 2010

Big News!

2 comments
So I posted the layout I did for the store's layout challenge yesterday. I found out today that I won! I got the most votes from customs that makes me so happy. Now what to spend the $25 on... so many things I want.

I finished the other card that I will be doing for next week's 2 for $5 class. Not a card that I am thrilled about but I do kind of like it. It is different from what I would normally do but I am really trying to push my limits.  I like the fold, I was very big into the typical side folding cards but I am trying to expand my  my portfolio of folds that I can do. This one is simple but super cute.  I have learned about inking since joining Cherished Memories and I love the look of it but I am stilling trying to get the technique down. For the most part I am doing o.k with it but every now and again I slip and I get a big "blob" and I ruin the look I am going for. I know everyone says that is the way it is suppose to look but I don't like it it make it looks messy. I like the ink looked cause it gives your project depth. I am still working away on it though. I am determined to learn to do this right, I will keep you posted. I do want to talk about the paper I used to do the "Thank you" it is a core paper and all I had to do was emboss the words and lightly sand the top layer and the lighter color came through. I love it, I can wait to get more colors to experiment with, I just like how easy it is to get two colors in one area.


I am learning how to make envelopes and that is fairly easy. The hard part is learning how to design them after they are put together. I like this one but there is still room for improvement. However the card that goes inside
this envelope, I simple love! The layering on the outside was so much fun and looks so nice. The organza ribbon gives the card the added "umph."  And I got to play with the embossing powders again doing the "Happy birthday" I don't like that you can see the inside flower from the outside but I have since learned how to fix that problem. The inside has a cool little cut out that allows you to hang things from making it  super de duper fun!

I have also been working on Mother's Day cards but I am not going to post them until later.

I'm doing a children's mothers day class with the above template tomorrow. I already did it with one group of children but tomorrow's class is with much younger children. So maybe I will end up changing the card. Hummmmmmmmmmmmm now I am going to be thinking about that all day tomorrow. Ha who am I kidding I will be thinking about that all night now.

Tomorrow I am cleaning up the soon to be craft room (trying to get rid of all the dust before we paint and stain) going to work 11-7 we have company coming for supper and I am going to miss half of it. :o( then off to work on the room. We pick up the conditioner, stain, rags, gloves and and brushes tonight. Each day we are getting closer and closer. Soon I shall have my own special room.

Sunday, May 2, 2010

3rd one today go me!

0 comments
Well I did not take pics of the baby card I made but I (we) finished the floor today! Well we finished sanding the floor anyway. I am so excited! Now all we have to do sweep and vacuum everything again (only did this a million times already) prime the walls, stain and varnish the floors, prime and paint the ceiling, paint the walls and then we get to move everything in and I will have my new craft room! Yeahhhhhhhhhhhhhhhhhh only took us 16 months so far. tee hee

Thought I should post a few more things that I did this month  sorry last month now (April)
For this layout I got to play with the embossing power again. I use to hate stamping, I thought it was so messy and to be honest. ugly looking. I have recently took it up again and have found a new love in embossing. For this layout I even mixed a couple of powers and got a really cool rough texture look for the dark paws. It actually looks like paws that have stepped into mud. very cool. I also found my collage maker for my computer and got to play with that for this layout combining the pictures of the dogs to give an over look at each of the dogs personality's. I then cut out each of the colored photos and lay them in around the b/w photos. It took a while to do but I really like the over all look of the final page.


Bad photo but you can see the over all idea. Not some of my best work but I had a lot of fun doing it,as this page was all white when I started. This was a couple of girls getting together to play with stamps and ink (chalk ink is awesome!) We tried a new technique and this was my finished product.

This is a easel card I made for a friends birthday it is an easy card to make but looks so elegant. 
In this position it can just be a work of art and depending  on how you decorate it, it could be displayed for a while. 
Slide it back just a little more and it displays your message. I just love this card, it looks wonderful and is practical. 


This was a layout I did for a class at the shop. My co-worker taught me how to make the "grunge" flowers and this is is the layout I worked them into. The flowers are super easy to make and the fun part is the messy you make them the better they come out. The rest of the work was done with the help from the wonderful cricut expression. I will own one someday when I make lots of money selling my cards. ya right. A girl can dream right?
There is so much more I could show you but I think I will wait for another night when I have not posted 3 post in one day, and when I have not been as creative as I have been the last little while. 
Off to putter on the internet for a little while and then off to bed. Tomorrow is work and working on my soon to be wick, awesome craft room.  Night 

Back from the market

4 comments
Well we just got back from the market, and yup I think I could sell my work there. There was no one else selling  what I do and they seem to be pretty busy. So now I can work on a bunch of different things stock up enough to sell and see about getting a table. Who knows it might be a way of making enough money to support my hobbies.

Anyway on another topic I have been working on a lot of different projects these days some of these some of you have seen some not so much. The following is a layout I did for the "Spring" layout challenge at work. I am super proud of it! The background paper is from the "Flower Child" line by Bo Bunny, it had some swirls on it but I add more with gold embossing in the bottom right hand corner and top left hand corner. I even inked the organza butterflies ( can't really see them in the photo) The green leafs are folded to give a 3d look as well ( again not really captured in the photo). I am proud of this cause a friend from work keeps telling me that I need to step out of my comfort zone ( working with cool colors in the same boring way (my words not hers) and used yellow ( I know there is still greens and blues but there is a lot of yellows) and gold. I love the result.
I teach some classes at the local scrapbook shop (http://www.facebook.com/group.php?gid=274143770771) the following are some cards I will be teaching people to make during class. 
Yesterday was National Scrapbooking Day and I did a layout for why I scrapbook. It is not something I am really really proud of but for this to be an honest blog I think I should post all my work not just things I am happy with. So here it is


I have another card made for a friend of ours who just had a baby, I will post that one a little later. Off to make an envelope for that card right now.  

(Update: We were running late and I forgot to take a photo of the card. Pout! Oh well that is life, they loved it though. )

Finally found my way back.

1 comments
O.K folks welcome to Brie's Handmade Hobbies. I have been avoided setting up a blog account forever thinking know one would read it, or care. However a friend of mine has been pushing me to set one up and after reading her's, and find out that other friends have blogs as well, I decided that it does not matter if everyone under the sun reads it. It is a way for my friends/family to see what I have been doing, it is for me, a way to document my life experiences and to remember and learn from what I am do at this moment in time.
Thanks Lori for kicking my ass in gear.
I shall be posting more about my art in later post, this was just to get me started and to stop putting it off. I am off now with WH to check out the local flea market and to see if it might be a good venue for me to start selling some of my work. I will repost back later.